Data Loads
Data Loads let you load data from SQL SELECT queries into an EntiHub entity in a controlled upsert flow.
This feature is designed for recurring source-to-entity synchronization where:
- source data is read from a SQL query
- target rows are matched by identity columns
- rows are inserted or updated
- delete is intentionally not supported
Data Load Setup
Data can enter the application in several ways: manual record editing, bulk editing in the built-in spreadsheet, file import, API endpoints, or loading from an external source. This guide focuses on external loads.
An external load means an external system (for example, a CRM) exports data into a predefined structure - a table in a database used as a source DB for EntiHub. The export can contain all current records or only changed records. In EntiHub, you define how those records update a selected entity and expose an API endpoint that can be triggered by an external integration tool such as Azure Data Factory, Apache Airflow, or a custom solution. You can configure multiple loads for the same entity, allowing different update strategies for different source systems.
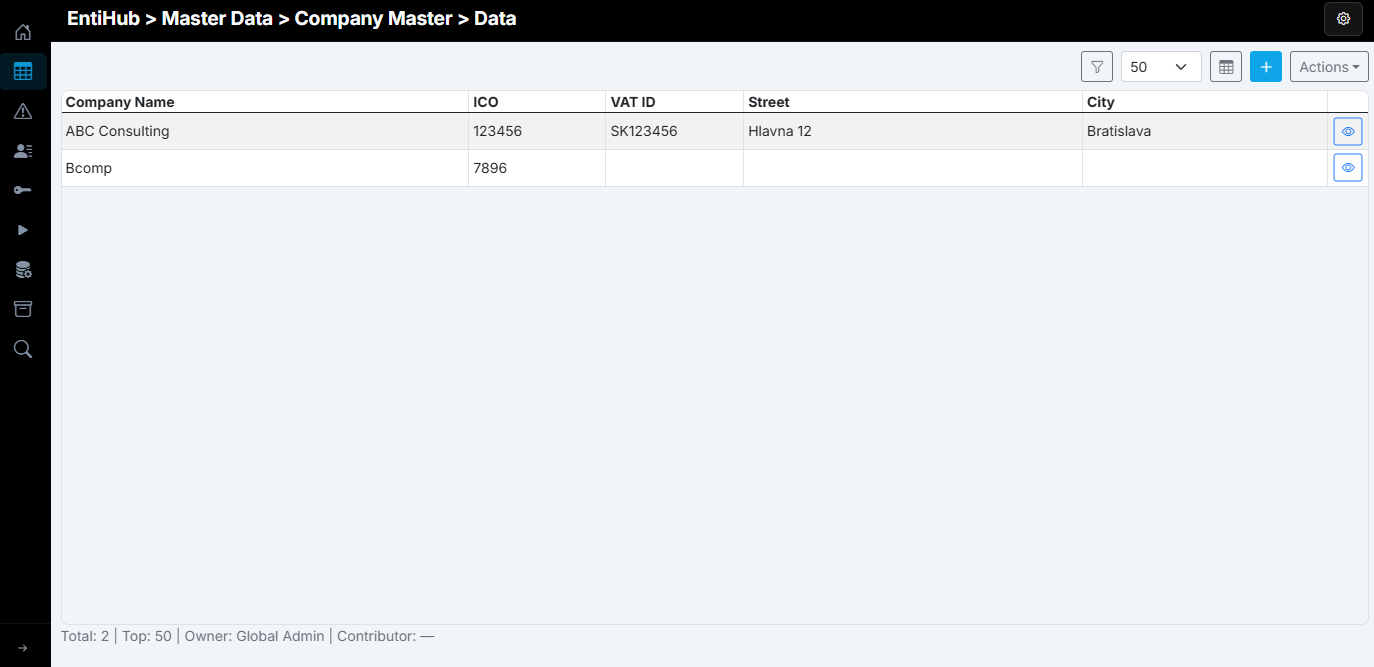
For this example, we use the sample domain Company Master. This domain is edited manually by selected users. As shown, some data is incomplete and some company names contain errors, while company registration identifiers (ICO) are correct.
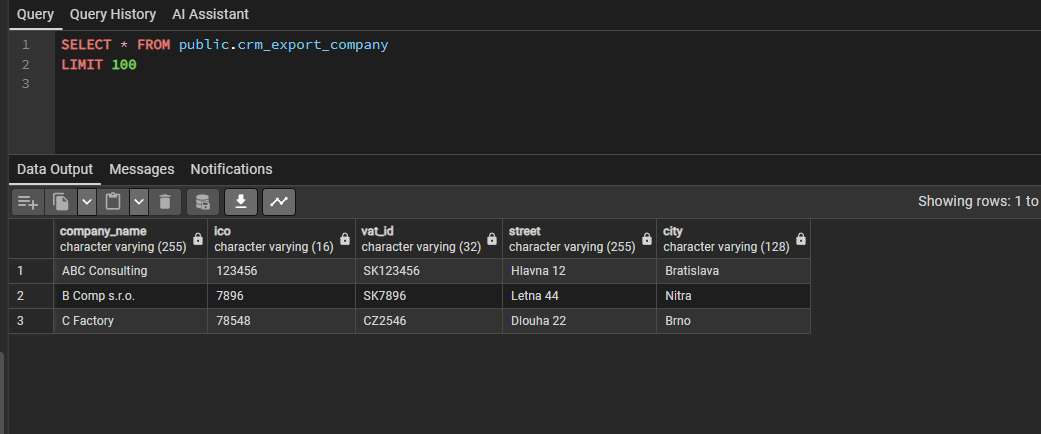
Kedze v CRM mame zoznam firemnych zakaznikov, chceme tuto tabulku obohacovat datami z tohto CRM systemu. Dohodneme si z dodavatelom CRM format exportu dat, ktory nam budu davat. Pojde o denne zmeny - teda vzdy pridu zaznamy ktore su nove alebo zmene. Tieto nam budu posielat do nasej PostgreeSQL databazy do tabulky public.crm_export_company. Dohodnutu mame strukturu a datovy charakter exportov - datovy kontract.
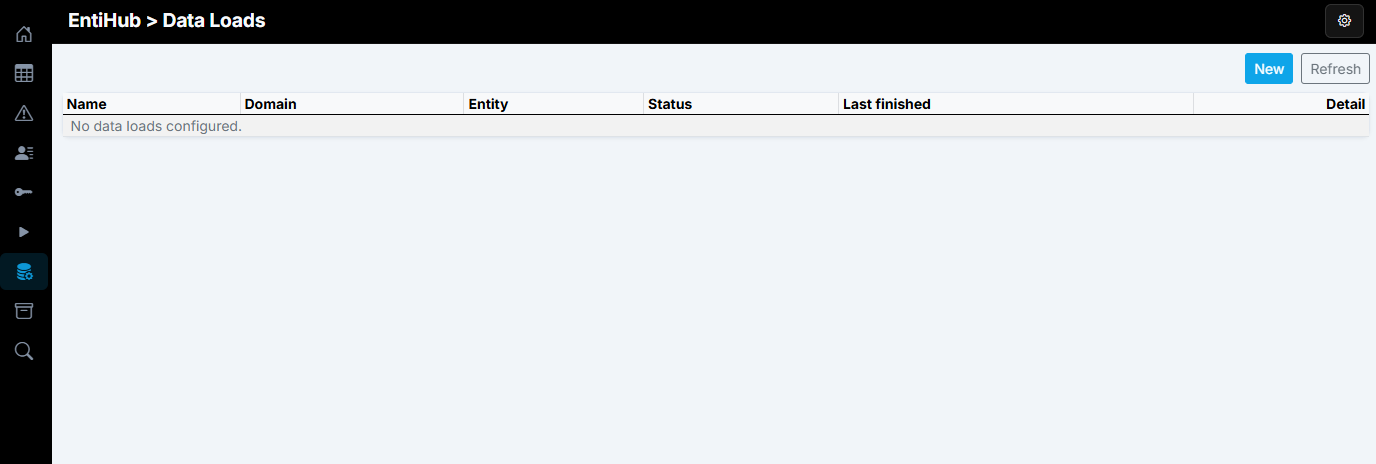
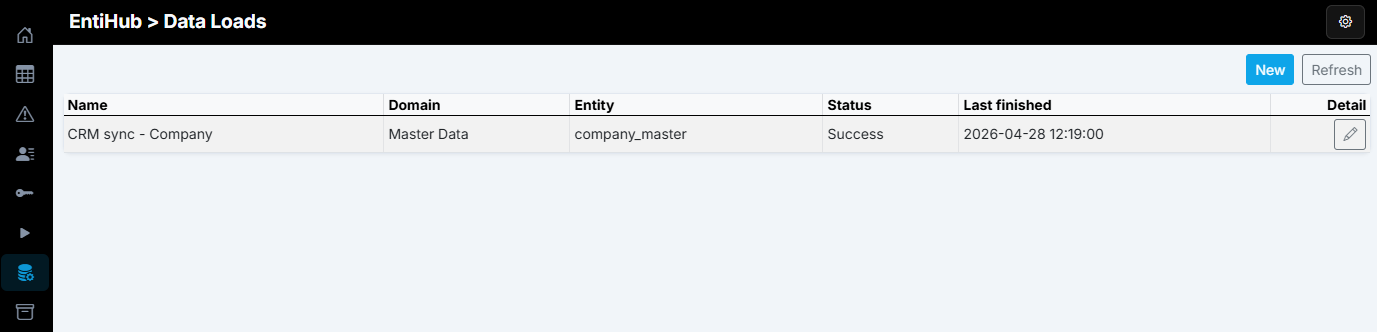
Our next step is to configure import/update logic for this export. In the left navigation panel, click Data Loads to open a list of all defined loads. In this example, no load is defined yet.
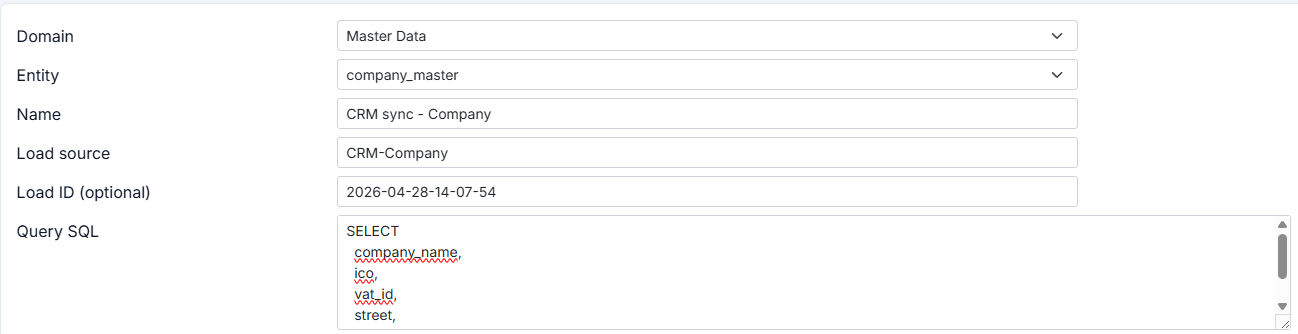
Create a new load by clicking New in the top-right corner. A dialog opens where you define the load configuration. First, select the domain and entity to which the load will be applied. Use the entity name (not display name) during setup, because display names may change. In the loads list, the Entity Display Name is shown when available.
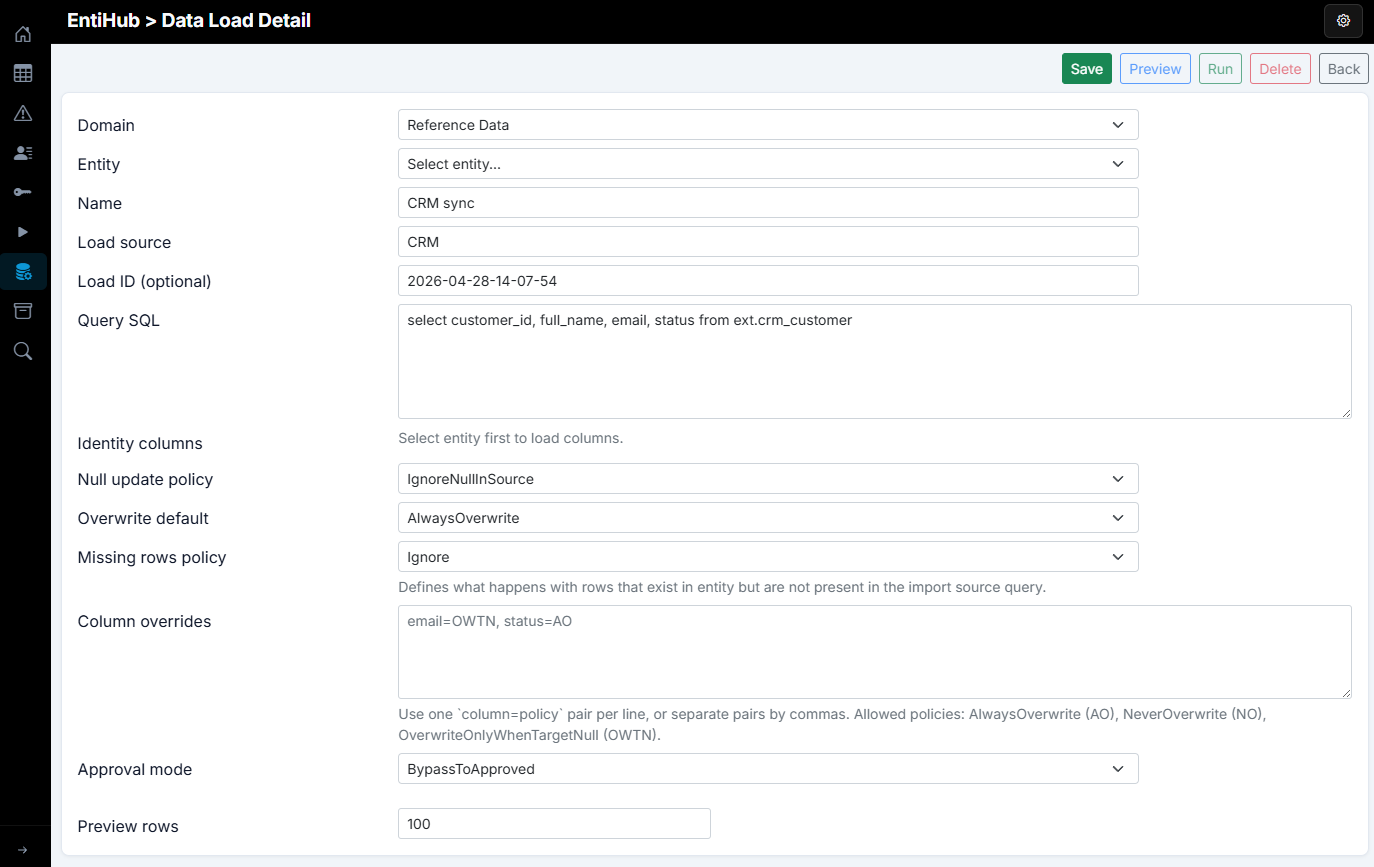
In the next step, define the load name. This name is shown in the loads list, so it should clearly identify the load. Then define Load Source. This value is stored with records in the _sys_load_source column and lets you trace where each value came from.
The Load ID parameter identifies a specific run that produced the value. In this dialog, it is informational and mainly used for manual runs started with Run. For REST API runs, loadId is sent in the request body and can represent, for example, a Data Factory pipeline run ID for cross-system traceability.
Finally, define the SQL query. This is the bridge between the exported source table and the entity. The SELECT result must return rows for insert/update, with column names matching the entity YAML definition (column:name). The result of this SELECT is used as input for the data load. You can also apply data cleansing directly in the query.
In the next step, similarly to SQL MERGE, define identity columns (one or more) that uniquely match records. If a source identity value is not found in the entity, a new record is created. If it exists, the current record is updated. If the record is soft-deleted, it is restored first and then updated.

How source values update the entity is controlled by the following settings. First, define the Null update policy, which controls behavior for NULL values in the source SELECT:
- Ignore Null In Source - if a source value is NULL, the update does not overwrite the target value
- Allow Null Overwrite - if a source value is NULL, it overwrites the current target value
This setting is applied to all columns returned by the input SQL SELECT.

The next parameter, Overwrite default, defines how source values overwrite target values. Available options are:
- Always Overwrite - always overwrite target with source value
- Overwrite Only When Target Null - overwrite only when the target value is NULL
- Never Overwrite - never overwrite the value
This default is applied to all columns from the input SQL SELECT.

The previous two selectors define default behavior for all input columns. Sometimes you need different behavior for specific columns. Use Column overrides to define per-column rules based on source data quality. For example, one column can always overwrite, while another only overwrites when target is NULL.

The Missing rows policy parameter defines what happens when an identity value exists in the target entity but is not present in the source SQL result. If you only update existing data, keep this option as Ignore so those rows remain unchanged. If you set Soft-delete not in source, those rows are soft-deleted so the target row count matches the source query.

If approval mode is enabled on the entity, you may want to bypass approval for trusted data. Set Approval mode to BypassToApproved to skip approval and write data directly to the final table. If left as None, data follows the standard approval flow, the same as manually processed changes.

At this point, all data load settings are defined. To test the SQL query, save the load using Save. After saving, an API endpoint for running the load is generated and shown in the dialog.

After saving, you can test the load. Click Preview to display the first rows of the SQL SELECT result under the dialog. Column names in the SELECT must match column names in the entity YAML definition because they are used for source-to-target mapping.

You can also run the data load manually from this dialog by clicking Run. The process starts and updates entity data according to your configuration. After completion, the run summary shows whether the load succeeded and how many records were inserted, updated, deleted, skipped, or failed.

In the main Data Loads view, you can see each load definition - load name, domain, and entity. The table also shows the timestamp and status of the last run.
After the load, the sample entity shows the expected result: missing values are filled, incorrect values are corrected from CRM data, and new records are added. This process allows controlled entity updates from external systems. Depending on configuration, each system can update selected columns or all columns, and can either overwrite values or update only when the target is NULL.

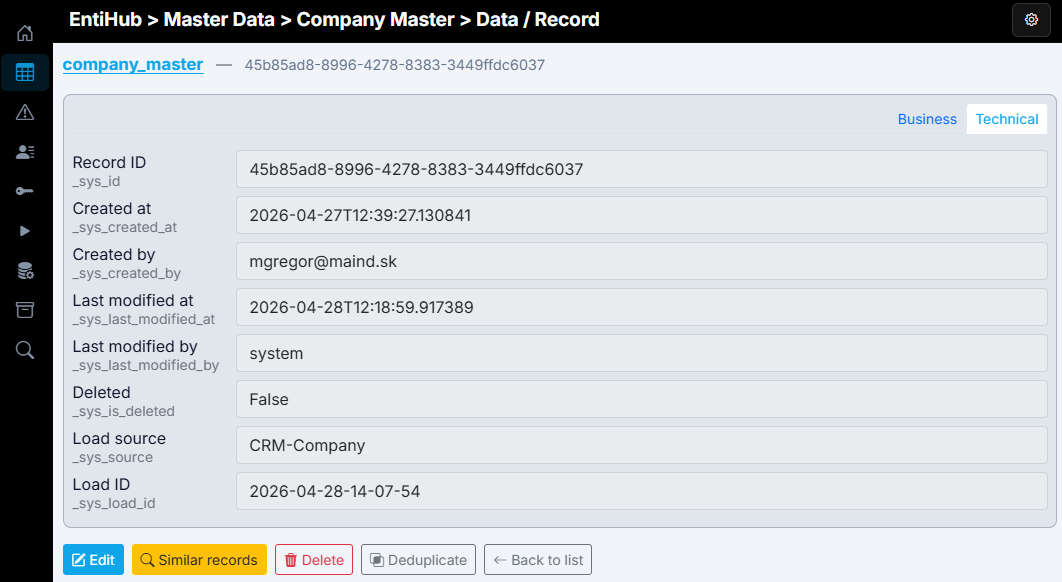
If you open details of updated records after the load, metadata includes load source and load ID according to your data load settings. If the entity is historized, you can also trace the source of individual values over time.
Data Loads are therefore a highly effective tool for controlled, automated updates from multiple source systems.
Availability and security
- Tier: Enterprise only
- Access: Global Admin only
- Definition model: one config record per load
Key rules:
- query.sql must be a single SELECT
- query.sql must not contain semicolon
- non-SELECT operations are rejected
- deleteSupport is not allowed
Lineage and traceability
During run, EntiHub writes lineage values:
_sys_sourcefromloadSource/ YAML lineage source_sys_load_idfrom provided or generatedloadId
For approval-enabled entities, lineage values are preserved when records move from edit to approved/history.
This allows downstream users to trace every published value back to the source run.
Notes for approval-enabled entities
If the target entity requires approval:
- mode BypassToApproved creates records in batch and auto-approves that batch
- if bypass is not used, data remains in normal approval flow
API run example
POST /api/data-loads/{id}/run
Content-Type: application/json

{
  "loadId": "src_20260421103000123"
}
If loadId is omitted, EntiHub generates one automatically.